In this article: You’ll learn how to properly set up the rear air suspension on your MOD Black. This guide covers how to adjust the air pressure, check sag, and fine-tune the ride feel for comfort and performance.
This Article Applies to the Following Bikes
Difficulty
★☆☆ Easy
Estimated Time
5–10 Min
Before You Start
Tools you will need
Measuring tape or ruler (optional for sag check)
Preparation
- Place your bike on a stable, flat surface and make sure the battery is turned off.
- Wipe down the rear shock area to remove any dust or debris.
- Locate the air valve, positioned near the top of the shock body.
- If possible, have a friend assist you during setup — it makes balancing and checking sag much easier.
Steps
Step 1: Identify the Rear Shock
The MOD Black rear shock features a single air valve that controls the positive air chamber, which determines how firm or soft the suspension feels. You’ll be working on the right side of the bike, where the shock’s air valve is located.
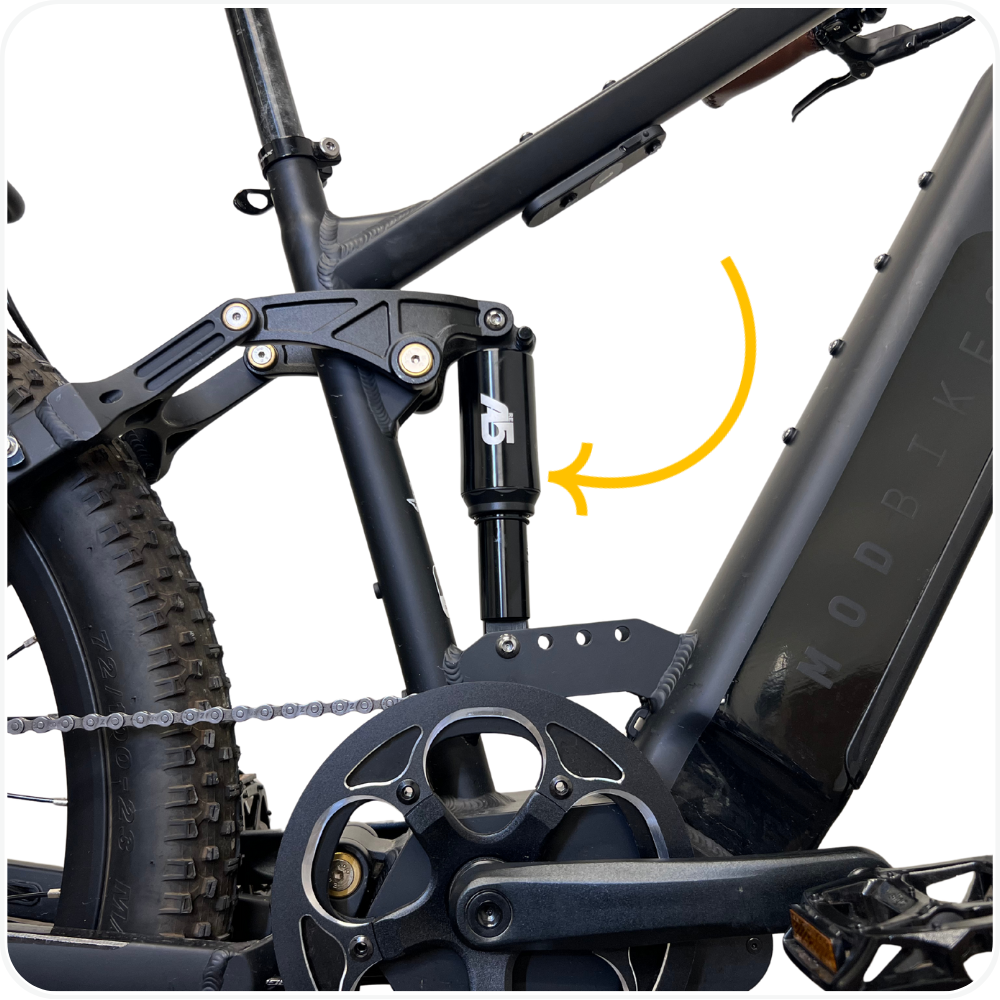
Step 2: Inflate the Shock
Remove the plastic cap from the air valve on the shock.
Attach your shock pump and slowly inflate it to the recommended PSI based on your body weight (see table below).
After inflating, press down on the seat several times to help the shock cycle and equalize the internal air chambers.

Note: For reference, the rider in this guide weighs 172 lbs and set the shock to around 152 psi for optimal sag.
MOD Black Rear Suspension – Air Pressure Setup Guide
Step 3: Check Your Sag
Sag is how much the rear suspension compresses under your body weight when you’re on the bike. Setting it correctly keeps your ride smooth, comfortable, and stable on bumps.

Here’s how to check it:
Slide the small rubber O-ring (on the shock shaft) up against the main shock body. If your shock doesn’t have one, you can use a small zip tie instead.
Step onto the bike and bounce lightly while standing. Give the rear of the bike a few small bounces to help the suspension settle. This is a firmer shock, so a gentle sit isn’t enough to engage it.
Step off carefully and check how far the O-ring moved down the shaft.
The shock should compress about ¼ – ⅓ of its total travel (roughly 25–30%). You can use a measuring tape or ruler to confirm the distance for reference.
Fine-tune the pressure:
- If it compresses too much, add 5–10 psi.
- If it barely moves, let out 5–10 psi.

Tip: This works best if someone helps you by holding the bike steady from the handlebars. If you’re doing it alone, level your pedals, step onto the bike, and bounce a couple of times — it’s okay if the bike rolls forward slightly to help you keep balance.
Note: As shown in the illustration above, the sag here is roughly 25% of the total travel, which indicates a perfect setup.
Step 4: Record Your Setting and Reinstall Cap
Once the sag feels right and the bike rides comfortably without bottoming out or feeling harsh, record your final PSI value for easy future reference.
Reinstall the plastic cap from the air valve on the shock.
Note: These are starting points based on our rear shock specifications and MOD Bikes’ in-house testing. Individual preferences, terrain, and cargo load may require fine-tuning.
Tips:
Always make small adjustments in 5 psi steps and recheck sag.
Recheck air pressure every few weeks or after long rides.
Keep your shock pump in your MOD toolkit for on-the-go adjustments.
Troubleshooting
Shock feels too stiff, even at the recommended PSI → Lower the pressure by 5–10 psi, then bounce the bike a few times to let the chambers equalize. This shock has a firmer initial stroke, so it may need slightly less air than listed for your comfort.
Shock bottoms out (compresses completely on bumps) → Add 5–10 psi to the air pressure. Recheck sag to make sure it’s within the 25–30% range.
No movement when sitting gently on the bike → That’s normal for this shock. Step onto the bike and bounce lightly to engage the suspension and get an accurate sag reading.
Air is leaking or pressure drops quickly → Check that the pump head was attached straight and tightened fully. Listen for leaks around the valve. If air continues to leak, contact MOD Support before riding.
Shock feels uneven or noisy after inflation → Make sure you’ve cycled (bounced) the bike several times to equalize the internal chambers. A brief “hiss” sound is normal during this process.
FAQs
Do I need to adjust both positive and negative air chambers?
No — the shock automatically balances both chambers through a single valve. You only need to pump air into the visible valve on the shock.How often should I check or adjust my suspension?
Check your shock pressure every few weeks or after several rides. Air naturally seeps over time, especially with changes in temperature.What is sag and why is it important?
Sag is how much your suspension compresses under your body weight when you’re seated on the bike. Correct sag ensures your rear shock stays active over bumps and provides a smooth, controlled ride.What if my bike feels bouncy or unstable after setup?
This usually means the air pressure is too low. Add 5–10 psi and recheck the sag.Can I damage the shock by over-inflating it?
Yes — do not exceed 250 psi. This shock is rated for a maximum of 250 psi, and exceeding this can cause seal failure or damage.
Warning
⚠️ Important Safety & Liability Notice

These instructions are provided as a general guide for adjusting the rear suspension on MOD Black. Always verify that your shock pressure is within the safe range and that all components are securely tightened before riding. Improper setup or over-inflation can lead to performance issues or equipment damage.

If you’re unsure about performing these steps or your shock shows signs of leakage or malfunction, please contact MOD BIKES Support or visit a qualified MOD technician for service.

MOD BIKES shall not be held liable for injury, damage, or loss resulting from improper use, setup, or failure to follow these instructions.
Was this article helpful?
That’s Great!
Thank you for your feedback
Sorry! We couldn't be helpful
Thank you for your feedback
Feedback sent
We appreciate your effort and will try to fix the article