The sidecar is an extension of your bike and may need fine-tuning to ensure it rolls straight. It connects to the bike through three adjustable arms and an attachment plate, which can shift slightly over time or after reinstallation. Minor misalignment is normal and easy to correct with a few simple adjustments.
In this article: You’ll learn how to check, align, and secure your sidecar so that your bike and sidecar track perfectly straight.
This Article Applies to the Following Sidecars
Difficulty
★★☆ Medium
Estimated Time
15–30 Min
Before You Start
Tools you will need
- Measuring tape
- Two foam blocks – included with your sidecar packaging and used to assist you during the alignment process
Preparation
- Park your bike and sidecar on a flat, level surface.
- Ensure both large spacers are included in your sidecar hardware kit.
- Having a friend help steady the bike and sidecar is recommended.
Steps
Step 1: Lock the bike brake
- Before doing anything, engage the brake lock on your bike to keep it from rolling forward or backward during alignment.
Note: The alignment will not be accurate if the bike can move while you’re making adjustments.- Squeeze the brake lever firmly.
- While holding it pressed, push down the small silver knob located under the lever.
- Release the lever. The knob will hold it in place and keep the brake engaged.

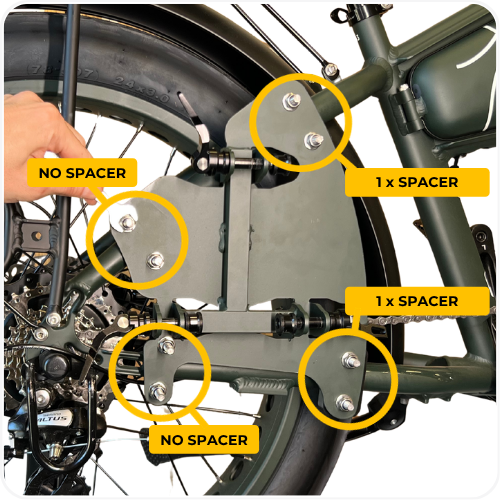
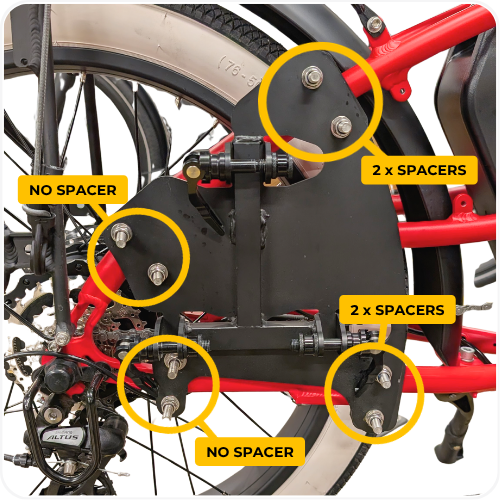
Step 2: Check the spacers on the attachment plate
Confirm that your sidecar’s attachment plate has spacers installed in the correct positions.
- Rear U-Bolts (MOD Easy/Sahara and MOD Groove): No spacers should be installed.
- MOD Easy/Sahara:
- One spacer at the front top of the plate (seat stay)
- One spacer at the front bottom of the plate (chain stay)

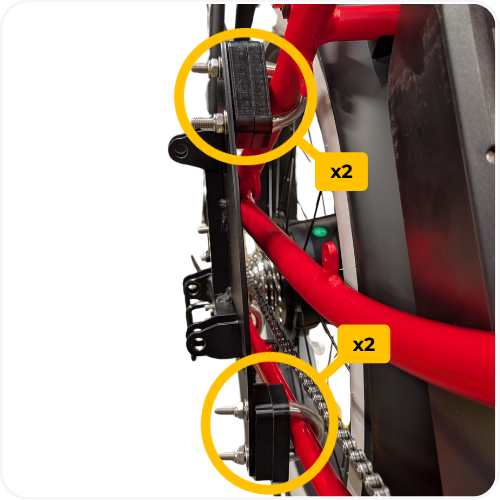
- MOD Groove:
- Two spacers at the front top of the plate (seat stay)
- Two spacers at the front bottom of the plate (chain stay)
Note: Missing a spacer? Contact support before continuing.
Step 3: Attach and set the eyelets
Thread the eyelets into the bottom mounting points on the attachment plate and insert the quick-release bolts.
Do not fully tighten yet; you’ll fine-tune them later during alignment.

Step 4: Connect and level the black top arm
- Connect the black adjustable arm to the top mounting point of the attachment plate.
- Twist the arm to adjust its length until the bike is standing completely upright and level. The bike should not lean to the left or right.
- Once the bike is level, tighten and lock both the top and bottom nuts on the arm to secure it in place and prevent movement. The nuts should be tightened outward toward the edges of the arm (anticlockwise), not toward the center. This locks the adjustment firmly in place.
- Visually confirm that the bike is vertical (as shown in the illustration or photo below). If necessary, have a friend hold the handlebars or use a bike stand to keep it steady.

Step 5: Use foam blocks to check alignment
- Place the first foam block on the right side of the bike’s rear tire.
- Place the second foam block on the inside of the sidecar tire, to its left side, so both blocks are directly across from each other.
- Both blocks should sit flush against the tires, forming a straight visual line from the bike tire to the sidecar tire.
Note: If you don’t have foam blocks, no worries at all - anything flat and stable works. Books, small boxes, or even containers are perfect. The goal is just to have something on both sides of the tires so you can visually line them up in a straight line.


Step 6: Measure and compare
- Now that the foam blocks are in place, you can measure and fine-tune the alignment.
- Use a measuring tape to measure the distance between the inner edges of the two foam blocks at the front and rear.
Compare the two measurements:
- Equal measurements → alignment is perfect.
- Front distance narrower → sidecar is pointing inward (toward the bike).
- Rear distance narrower → sidecar is pointing outward (away from the bike).


Step 7: Adjust if needed
- If both the front and rear measurements are equal, your alignment is perfect — you’re ready to ride!
- If the measurements are not equal, you’ll need to fine-tune the sidecar’s attachment arms.
- Disconnect the top connecting arm.
- To adjust the bottom eyelets, first remove the quick release bolt that secures the eyelet.
- Once the quick release bolt is off, rotate the eyelet:
- Screw it in (shorten) to bring the sidecar closer.
- Unscrew it (lengthen) to move the sidecar further away.
- Reinstall the quick release bolt, tighten it, and test the alignment again by measuring front and rear distances.
Tip: Adjust in small increments and re-measure after each change. Even a few turns can make a big difference.

Step 8: Repeat adjustments until aligned
- Repeat small adjustments as needed until both measurements are exactly the same.
- Once both measurements match perfectly, tighten both nuts securely clockwise and confirm that the bike and sidecar roll straight.

Step 9: Tighten bolts and test
- Once satisfied, tighten all nuts and quick releases securely.
Tip: If the quick-release clamp won’t tighten even after turning the nut, use this method — the lever itself is designed to screw the bolt in.

1. Open the lever fully.
2. Hold the nut on the opposite side so it doesn’t move.
3. Hook the lever into the slot on the bolt head.
4. Turn the lever clockwise — this threads the bolt deeper into the nut.
5. Repeat: open, hook, and turn again until the lever closes firmly and the clamp no longer rattles.
- Roll the bike forward a few feet — the bike and sidecar should now track straight without pulling.
⚠️ Important Note on Riding Position

Once your sidecar is perfectly installed and aligned, you may need to slightly adjust your pedaling stance for comfort and clearance.

Typically, riders place the ball of the foot on the pedal when riding. However, with the sidecar attached, this position can cause the heel of your right foot to touch the sidecar arm during pedaling.

To prevent this, slide your feet a few inches forward on the pedals so that the pedal rests at the middle of your foot.

This small adjustment ensures your heel clears the sidecar arm and provides a smoother, more comfortable ride.
Troubleshooting
- Sidecar pulls to one side → Ensure the bike is upright and the attachment plate is level before tightening. Also make sure you’re keeping your handlebar straight and eyes forward while riding. Body posture can naturally cause small steering input that makes the bike drift.
- Sidecar points outward or inward → Remove the quick release bolts and rotate the eyelets to fine-tune length, then reinstall and remeasure until front and rear distances match.
- Bike tilts toward the sidecar → Adjust the black top arm by twisting it until the bike sits vertically, then lock the top and bottom nuts.
- Sidecar feels loose after alignment → Tighten all bolts, nuts, and quick releases securely on every attachment point.
- Bike still feels off while riding → Slight pulling can be normal if the sidecar is empty. For better balance, place a sandbag or small weight in the sidecar when riding solo.
FAQs
Can I adjust the alignment by myself?
Yes, but having a second person to hold the bike steady makes it easier.How do I know when the alignment is correct?
When the front and rear measurements between the foam blocks are exactly the same and the bike rolls straight without pulling.Do I need to remove the quick release to adjust the eyelets?
Yes. Remove the quick release bolt, rotate the eyelet to adjust its length, then reinstall and test again until the measurements match.How often should I check alignment?
Recheck every few months or anytime you reinstall the sidecar or frequently ride on rough terrain.
Warning
⚠️ Important Safety & Liability Notice

These instructions are provided as a general guide for MOD BIKES products. Always ensure that all screws, bolts, and fasteners are properly tightened and secured before riding. Improper assembly or maintenance may result in damage, injury, or voiding of warranty.

If you are not confident performing these steps, please seek assistance from a qualified MOD BIKES technician or authorized service provider. MOD BIKES shall not be held liable for injury, damage, or loss caused by improper use, assembly, or failure to follow these guidelines. Local laws and regulations may apply.
Was this article helpful?
That’s Great!
Thank you for your feedback
Sorry! We couldn't be helpful
Thank you for your feedback
Feedback sent
We appreciate your effort and will try to fix the article